Friday, July 31, 2015

Vintage Pillowcase Dress or Nightgown

I participated in a flea market a month or so ago for the second year now. I decided this year to focus on my pillowcase dresses. These are what started me sewing again after many years off. I just love the idea of making something beautiful and useful from something long forgotten. Like all those old bed linens that have been cast aside and sent to auctions or garage sales. Some of which have been embellished by hand with intricate embroidery work. To be able to breath new life into them and see them as adorable dresses on little girls is amazing to me. I have a crap ton a few old bed linens just waiting to be made new again. As I started sorting through them and matching them with fabric and ribbon, I noticed I had quite a few solid color and some prints that just seemed to "pillowcasey" to me made into a dress so I decided to make some nightgowns too. Lets face it, they just don't make pillowcases like that anymore. The fabric just gets softer the more you wash it and it just screams pj's to me! Here are just a few of the ones I made (that didn't sell, because of course I forgot to take pics of all of them):

Pillowcase DressPillowcase dress


These are both for sale in my Etsy shop if you are interested!  

I am linking to Made by You Monday @ Skip to My Lou and Wildy Original Linky Party @ I Gotta Create and The Party Bunch @ Thirty Handmade Days


Monday, October 21, 2013

craftiness

I haven't had too much time for crafting but my step-son's girlfriend had a birthday so I made her a bow for her hair.  She plays softball so we found one on Pinterest and made our own version.  We cut a softball apart (harder than it sounds) and used it to make a Softball Hair Bow.   

Softball hair bow

Also, in an attempt to clean up the sewing room, I found the cushions to the boys' rocking chair from their room that needed recovered.  I whipped those out and so ended the desire to clean.  Oh well.

recovered chair cushions


Wednesday, April 4, 2012

Wow, It has been a long time!

So much has happened since we last spoke.   Most important....we moved to a new house!  It has been a long and mostly exciting adventure.  We "swapped" houses with my sister.  She had a 6 bedroom two story house in town and we had a smaller ranch in the country.  She is going through a divorce and needed to downsize and with us fostering now, we needed more room.  Moving day was organized chaos to say the least!  It was gorgeous weather the week prior to move in day but we woke up to snow the morning of.  (Figures!)  We worked through it and after 12 hours, two falls (me included), some broken glass and a tv dropped face down, we were moved.  (For the most part)  I don't have many pictures because someone (nobody is taking credit) dropped my camera and broke it.  I am hosting Easter at my house this weekend so I will snap some even if it is with the phone. 

Monday, October 24, 2011

Gonna Give This a Try

I have had an account with Etsy for  awhile and I set up my shop recently to see how it goes.  Stop by and check it out and let me know what you think.  I would love any advice or tips from anyone who sells on Etsy. 

Friday, September 30, 2011

If God Leads you to it, He will lead you through it.

This is what I have been telling myself for the past couple days.  This post has nothing to do with crafts, decorating or anything like that.  I have a very heavy heart and I need to get it out so it doesn't weigh me down. 

My husband and I have spent the past 4 months or so getting licensed to become foster parents.  It is a very long and tiresome process to say the least.  We only had a few things left to finish up when I got a call from our PRIDE instructor (those are the classes that you have to take first) who also works for DCFS asking me how close we are to being licensed.  She had a 3 year old little boy on her caseload that the current foster parents had put 2 weeks notice in for.  They have two other foster kids and this little boy was being too rough with the 10 month old.  It all sounded like it was meant to be.  What are the chances that a boy, in our small town needed a home just as we were ready for one?  So, we met him, had him for the whole day so he could get acquainted with his new home, and the fun part, bought and acquired all the necessary gear for a toddler!  Then, yesterday morning, just a week before we would get him placed with us, I found out that his paternal grandmother came forward and wants him.  Yesterday was the first time he has even met his father and now he will be living with him and his mother.  I KNOW that the goal is for kids to be placed with relatives whenever possible BUT, I also KNOW that I could better provide for his needs than she can.  So, tonight I get to break the bad news to my kids and try to explain it all to them.  It will be a good lesson for them as we start this process so they understand that we are just helping these kids out by giving them a safe place to live until they can return home.  So, like I said, I know that God lead us to this and He will lead me through it too! 

Sunday, September 4, 2011

What I've Been Doing

Well, I had hoped things would calm down after school started, BUT that has not been the case yet!  Mr. Icky and I started the process to become foster parents.  Tuesday will be our last class.  It has been a lOnG 9 weeks.  Now I know why there is such a need for foster parents..... it is a LOT of work to get licenced.  I know it will be worth it in the end.  Most of what I have been doing around the house is to get the house ready, child proof, and more organized.  I have found time for my addiction, PINTEREST!  Here are a few things I saw and had to re-create:


I have been looking for a better way to store my necklaces to keep them from getting tangled.  This one from Pinterest is a towel bar and shower curtain hooks.

necklace holder

I found this towel bar at Hobby Lobby and used "S" hooks. 


towel bar necklace holder

I saw this doily table runner


and knew I had to make on with all those doilys I had stashed all over the house. 

doily table runner

Now, it's off to bed so we can get up early and go to the Labor Day Parade.

Erica

Thursday, August 4, 2011

Motorcycle Diaper Cake Tutorial

OK, I had a couple requests for a tutorial for the motorcycle diaper cake so I had my private photographer (Kailee) help me out!

I used 40 size 2 diapers, 1 bottle, 2 bibs, 2 pairs socks, 2 receiving blankets, rubber bands, tape and ribbon. 
motorcycle diaper cake supplies

First, I made two stacks of 20 diapers each.  My package of diapers had 42.  Roll up one of the extra diapers and tape the ends.

motorcycle diaper cake supplies


Start wrapping one stack of diapers around the rolled up diaper and put a rubber band around it. 


Keep adding diapers in this fashion until you have all 20 diapers.  You have just made one wheel!

how to make a motorcycle diaper cake

Now you can take the center diaper out.  (This just holds the spot that the blanket will go in later.)  Next, do the same thing again for the other wheel.

For the first motorcycle, I covered the wheel with a receiving blanket, but this one, I just wrapped each wheel with ribbon and either tape or glue it.  I think I like it best with the ribbon.

how to make a motorcycle diaper cake


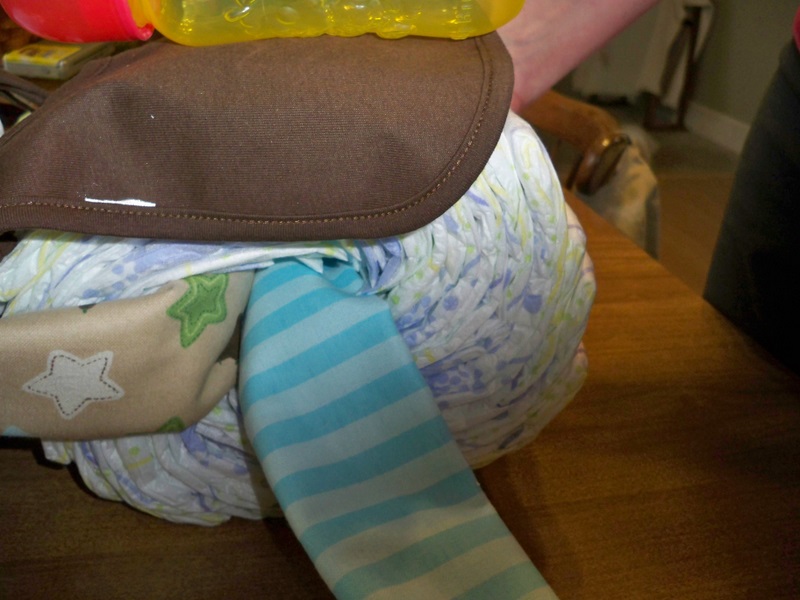
Now, take one of the receiving blankets and fold it until it is about 3 inches wide.  Slide the blanket through the center of one of the wheels and then through the center of the other wheel too. 
 
how to make a motorcycle diaper cake


how to make a motorcycle diaper cake


Take the ends of the blanket and using another rubber band, secure the ends of the blanket and tuck them neatly in the center of the wheel. 


how to make a motorcycle diaper cake


how to make a motorcycle diaper cake


Lay your bibs on the top of each wheel and put the bottle on the front wheel, on top of the bib.  Then, take the other blanket folded in the same manner as the first and run it through the middle of the front wheel.

how to make a motorcycle diaper cake


Pull the ends of the blanket up, making sure they are even, and secure with a rubber band on top of the bottle. 

how to make a motorcycle diaper cake

how to make a motorcycle diaper cake


Now for the handlebars.  I used two pairs of socks, but on the first one, I layered several pairs of socks because of the package of socks we bought. 
\
how to make a motorcycle diaper cake

(notice my puppy helper in the background?)

how to make a motorcycle diaper cake


Next I made a bow with coordinating ribbons to hide the rubber band on the handle bars.  I think they look best with a stuffed animal or doll riding on it, but that is up to you!

how to make a motorcycle diaper cake

how to make a motorcycle diaper cake


OH, in case you need an idea for that extra diaper...... Kailee recommends this.....


Poor dog doesn't stand a chance!  At least she cut a hole for her tail this time. 

Hope this helps.  If you have any questions, let me know!

Erica


p.s.  I have this one listed in my Etsy Store if anyone is interested.